
A short how to adding NetFlow to Mikrotik using ntop and FreeBSD. FreeBSD is the best operating system you can go for your server. While Mikrotik is a budget router it is capable of many. I’m covering Ntop not Ntopng. While Ntopng is fancier, requires a probe to collect NetFlow which is not free. Without the probe you can still collect traffic on the server where Ntopng is installed but not from another device. You can buy a NetFlow capable Mikrotik router for less than $50. Of course, if you have the big bucks you can go with a Cisco and Ntopng.
This article assumes you know already how to install FreeBSD and do basic configurations on Mikrotik.
Let’s install Ntop, this can be done using precompiled packages or from source.
Package, using pkg
pkg install ntop
pkg will update automatically it’s repository, however you can can also invoke it manually with pkg update.
Ready carefully the details, only proceed if you agree with all what the package manager is telling
Source, using ports
Ports however won’t update automatically the ports tree, you have to do it yourself, be sure to do this before installing anything from ports
portsnap fetch

portsnap update
cd /usr/ports/net/ntop

make config-recursive

make install clean
Using config-recursive instead of config will configure all dependencies as well, so you can step away while the source code is compiling, it could take awhile.
Installing software from ports and packages on the same server requires lots of attention, so be careful. Explaining is out of the scope of this article.
After you installed ntop enable it:
sysrc ntop_enable="YES" or carefully add it manually to /etc/rc.conf.
Additional flags can be set, like sysrc ntop_flags="-d --use-syslog=daemon -u nobody -4"
- -d: run as a demon
- –use-syslog=daemon: ave the messages into the system log
- -u nobody: run as user nobody
- -4: IPv4 only
Now start the service:
# service ntop start

Starting ntop.

Sun Feb 11 16:25:58 2018  Initializing gdbm databases

# service ntop status

ntop is running as pid 4277.
You should see the service running and listening on 3000/tcp:
# sockstat -l|grep ntop

nobody   ntop       512   2  tcp4   *:3000                *:*

nobody   ntop       512   8  dgram  (not connected)
Now go to http://address_of_your_server:3000, voila, there is your Ntop.
Let’s add the NetFlow support.
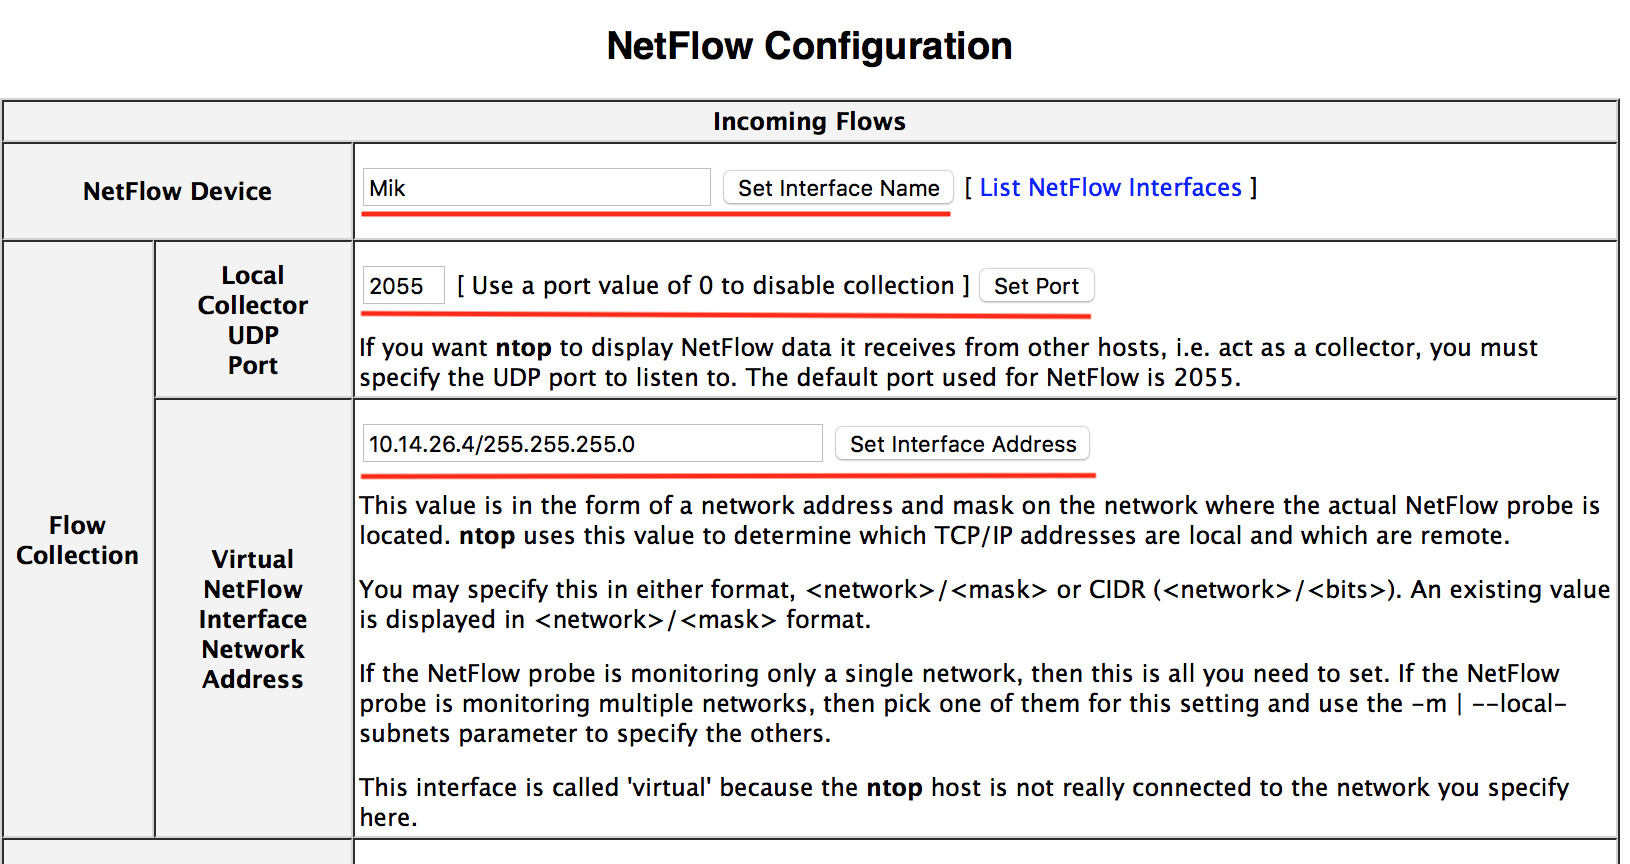
Go to Plugins-NetFlow-Active
- Set NetFlow Device – Whatever name you want for your device
- Local Collector UDP Port – default is 2055
- Virtual NetFlow Interface Network Address – address_of_your_server
Check if your server is listening
# sockstat -l|grep ntop

nobody ntop 512 2 tcp4 *:3000 *:*

nobody ntop 512 8 dgram (not connected)

nobody ntop 512 15 udp4 *:2055 *:*
Good. Now we can proceed configuring Mikrotik
[user@MikroTik] > ip traffic-flow set active-flow-timeout=1m enabled=yes

[user@MikroTik] > ip traffic-flow target add dst-address=address_of_your_server port=2055 v9-template-timeout=1m
Check if it is there
[user@MikroTik] > ip traffic-flow target print

Flags: X - disabled

# SRC-ADDRESS    DST-ADDRESS              PORT       VERSION

0 0.0.0.0        address_of_your_server   2055       9
Go back to your browser, then Plugins-NetFlow-Statistics, you should see some data.
Of course you can use a Linux distro instead, but why would you use Linux when you can use FreeBSD?
Why do this? To see what really happens on your network and find some amazing details about it.